Search This Blog

Monday, May 07, 2012

Perl Diver 2.33: Download and Installation


If you write—or need to maintain—Perl scripts, it can be incredibly helpful to have a way to print out all your environmental variables, installed modules, and the like, much like PHP's phpinfo().

Up until 2006, a site called ScriptSolutions.com—no longer in service—offered a free program you could install called Perl Diver. Version 2 of the script offered a lot of extra functionality. The last version of the script to be released was 2.33, which fixed an exploitable hole in the module parameter for versions 2.x prior to this release.

The bottom line is that Perl Diver is still an excellent tool, and it's a shame to see the fixed version leave the public realm with no place to download.


Download, Basic Installation:

After searching everywhere for a copy, I finally secured one, and am again offering the script to the public.

If you have git access, obtaining a copy from GitHub is as simple as:
# as ssh
git clone git://github.com/mrrena/perldiver
# as https
git clone https://github.com/mrrena/perldiver
Otherwise, download a copy of the perldiver zip. Installation should be a matter of unzipping the contents of this file wherever you keep your Perl scripts.

If you do not have git access (file permissions are automatically retained in git), you will also need to give the script execution permission, either using the following command:
chmod +x perldiver.pl
Or via an FTP program like FileZilla, setting perldiver.pl to "755": refer to this blog post if you don't know how to do that.

If you need to change the extension to .cgi, you will also need to change the file name in perldiver.conf:
# only if you change the file extension to "cgi"
'script_name'      => 'perldiver.cgi',

Hide From Search Engines:

To keep the search engines from indexing the page in their results—you probably don't want to broadcast your server's environmental variables to the entire world—you should also create an entry in your robots.txt file.

If you don't have one already, create a plain text file and enter the following lines (assuming that the directory in which you're including Perl Diver is cgi-bin):
User-agent: *
Disallow: cgi-bin/perldiver
Save your file with the name robots.txt, and then upload this file to your web server's root directory.

All paths specified in the file are relative to root; you can check your file at this link or, if you have a free account, you can use Google's Webmaster Tools for the same. For more info on robots.txt files, see Google's Block or remove pages using a robots.txt file.

Password Protecting:

It's also a really good idea that you keep the script from hackers manually fishing for info. Perl Diver is used on a lot of websites, and hackers have learned to look for unprotected copies. You can avoid this type of hack by password protecting the perldiver directory. Assuming that you use Apache, directions follow.

You will need to replace Apache's example username rbowen below with the username used when you access scripts from your site via http / https. Here is the relevant excerpt from Apache's Authentication, Authorization and Access Control page:

Getting it working

Here's the basics of password protecting a directory on your server.

You'll need to create a password file. This file should be placed somewhere not accessible from the web. This is so that folks cannot download the password file. For example, if your documents are served out of /usr/local/apache/htdocs you might want to put the password file(s) in /usr/local/apache/passwd.

To create the file, use the htpasswd utility that came with Apache. This will be located in the bin directory of wherever you installed Apache. To create the file, type:
htpasswd -c /usr/local/apache/passwd/passwords rbowen
htpasswd will ask you for the password, and then ask you to type it again to confirm it:
$ htpasswd -c /usr/local/apache/passwd/passwords rbowen
New password: mypassword
Re-type new password: mypassword
Adding password for user rbowen
If htpasswd is not in your path, of course you'll have to type the full path to the file to get it to run. On my server, it's located at /usr/local/apache/bin/htpasswd

Next, you'll need to configure the server to request a password and tell the server which users are allowed access. You can do this either by editing the httpd.conf file or using an .htaccess file. For example, if you wish to protect the directory /usr/local/apache/htdocs/secret, you can use the following directives, either placed in the file /usr/local/apache/htdocs/secret/.htaccess, or placed in httpd.conf inside a <Directory /usr/local/apache/apache/htdocs/secret> section.
AuthType Basic
AuthName "Restricted Files"
AuthUserFile /usr/local/apache/passwd/passwords
Require user rbowen
For additional details, see the full Apache manual page.

Saturday, May 05, 2012

pss: The Command-line Search Tool I Never Leave Home Without


Use:

Ever since I discovered the Python tool pss, I fell in love. It's blazingly fast and drop-dead simple to use. 99% of the time, you just type:
pss "search phrase"
The idea is pss REGEXP: you can use an escape character if you need to search for a character literal:
pss "\$method = 'post'"
or triple escape if searching for a single pattern (that is, an unquoted string):
pss \\\$method
I tend to think of pss as a sort of "grep+" for this kind of searching:* it's automatically recursive, whereas grep is not, and it ignores certain file types by default. (These can all be configured: for additional information, see Announcing pss, pss0.3.5, and Usage samples.)

Installation:

Assuming that you have Python installed on your machine (if not, grab it here), you can install pss using pip:
pip install pss
If you do not have pip, you should be able to just type:
easy_install pip
pip install pss
Finally, if you don't have easy_install either, you can get the toolkit / directions at setuptools 0.6c11.

* grep is still invaluable for piped searches:

tail package.json | grep "MIT +no-false-attribs" 
yum list available | grep mysql

And don't forget find...

1. When you want to search for file / directory names:
# find the php.ini config file starting at the /etc directory
find /etc -name 'php.ini'
# find all .php files starting at local directory (.)
find . -name '*.php'
2. When you want to bulk-replace file extensions:
# change .JPG to .jpg for all files starting at local directory
find . -name '*.JPG' -exec rename -s .JPG .jpg {} \;
3. When you want to bulk delete files:
# delete all .pyc files starting at local directory
# GNU find
find . -name '*.pyc' -delete
# Universal
find . -name '*.pyc' | xargs rm -f {} \;

Sunday, April 29, 2012

Colorizing Vim: How To Change Color Schemes in Vim


Colorizing Vim


Note: It is recommended (but not required) that you download VimConf, the vim customization we use at IWS: simply follow the directions under Setup on the GitHub page.

Also, if you're on Mac OSX, you will want to use iTerm2 if you don't already, as it supports 256 colors and provides improved functionality over the native Terminal app.

Changing your vim colors is pretty easy, particularly if all you are doing is installing pre-packaged color schemes.

First, navigate to the .vim subdirectory:
# with VimConf
cd ~/VimConf/.vim

# without VimConf
cd ~/.vim

Then check and see if you have a colors directory:
ls

If not, make one...
mkdir colors

then switch into it...
cd colors

Google Code's Vim Color Scheme Test has screen shots and links for 428 different vim schemes. Under the heading Browse By File Type at the bottom of the page, select the language you'd like to see the vim screen shots in. This will take you to the page of screen shots, which take a while to load, as there are 428 schemes in 428 iframes. (Smiles.)

Above each screen shot is the name of the scheme, which doubles as a direct link to the scheme's source file. Just right click the scheme's name, then select Copy Link Address (in Chrome) or Copy Link Location (in Firefox) from the context menu.


Jellybeans color scheme

Once copied, you can use wget + paste to park the file directly in your colors directory without further modification. For example, I selected the following schemes, all of which are compatible with 256 colors:*

wget http://vimcolorschemetest.googlecode.com/svn/colors/jellybeans.vim
wget http://vimcolorschemetest.googlecode.com/svn/colors/xoria256.vim
wget http://vimcolorschemetest.googlecode.com/svn/colors/lucius.vim
wget http://vimcolorschemetest.googlecode.com/svn/colors/wombat256.vim
wget http://vimcolorschemetest.googlecode.com/svn/colors/asmanian_blood.vim
wget http://vimcolorschemetest.googlecode.com/svn/colors/desert256.vim
wget http://vimcolorschemetest.googlecode.com/svn/colors/zenburn.vim
wget http://vimcolorschemetest.googlecode.com/svn/colors/inkpot.vim

Finally, to actually use a color scheme you downloaded, open your vimrc file...
# with VimConf
vim ~/VimConf/.vimrc_custom

# without
vim ~/.vimrc

...and add colorscheme, a space, and the name of the file (minus the extension). Using jellybeans.vim as the example, it would look like so:

colorscheme jellybeans

Then save your file, and...

Enjoy!
Eric

Related posts: Featuring "Vim and Vi Tips: Essential Vim and Vi Editor Skills, 2nd ed."

* I mention 256 colors for a reason: not all of the featured schemes render correctly (at least without disabling your 256 color support). Many offer a "256" version, however, as seen in the sample links above.

A second thing to note is that if you load a scheme and get weird load errors, that usually is because the file was saved on a Windows machine and the line endings are bonked (Unix/Linux uses \n, Mac \r, and Windows \r\n).

There are probably better solutions, but my approach was to...
cat affected_file.vim

copy the readout in my terminal, empty the file with...
> affected_file.vim

then open the now empty file in vim...
vim affected_file.vim

make sure that I'm in paste mode...
# with VimConf
,p

# without
:set nonumber

go into insert mode
i

and manually paste the contents back in.

Friday, February 10, 2012

Firefox 10 Context Menu: Inspect Element versus Inspect Element with Firebug

If you use Firebug and find yourself wanting to inspect an element in Firefox 10 or higher only to be surprised by a dark modal background and breadcrumb trail that looks (and functions) considerably different than the one you're used to seeing when inspecting an element in Firebug...

...there is a work-around for removing the option from the context menu leaving only the usual "Inspect Element with Firebug" at the bottom; see http://jamesroberts.name/blog/2012/02/07/disable-firefox-native-inspect-element-context-menu/ for details.

Sunday, October 30, 2011

How to migrate mail from one Gmail account to another on Windows, including Chats


This is the Microsoft Windows version of this article (though it contains screen shots from Mac). The Mac OSX version can be found here.

Recently at work, we got a new Gmail domain and had to switch from one Gmail account to another.

You can migrate your mail easily using POP3, but POP3 won't get your chats or preserve your labels. The superior solution is IMAP, even if it's a little more cumbersome. And even if you have already migrated using POP3, IMAP will still allow you to retrieve your chats and work for you on a tag-by-tag basis.

IMAP requires bit of a work-around—you must first fully download all your files to your machine, and only then can you migrate them back again into your new Gmail account.

Here's everything you need to get set up.

First, the downloads.
  1. Download Mozilla Thunderbird and install on your machine.
  2. Download and unzip the toIMAP files (we'll set these up later)
Now log in to your usual (old) Gmail account.

Then:

1. Click the gear icon in the upper-right corner and select Mail settings:


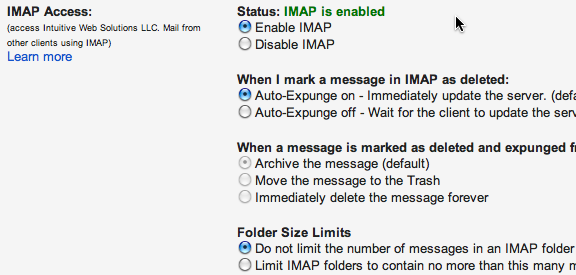
2. Click the Forwarding and POP/IMAP tab, scroll down to IMAP Access, and make sure it is turned on:


3. Click Labels and make sure that Chats and any other labels you want migrated are checked. (Note: If you already used the POP3 solution, you might want to limit only to Chats.)


4. Open Thunderbird, click Create a new account and use the address you want to pull the mail from, then click Continue:


Note: The wizard should smartly detect the proper settings; if not, you can click Manual config and enter the IMAP and SMTP settings shown below:


5. Click Create Account and let Thunderbird start downloading; this may take hours, and it goes without saying that the more mail you have, the longer the process will be. If you have to shut down for a while, to easily restart where you left off, just open Thunderbird, right-click, and click Get Messages in the context menu:


6. Log in to your new account and repeat steps 1 and 2 above for it. Make sure that you re-create any custom labels you used in your old account:


Now... go find something else to do for a few hours and come back to step 7 after Thunderbird (eventually) finishes.

7. Yay! Your e-mail finally downloaded! Rejoicing, right-click your account name, and click Settings (last option in the screen shot for step 5). Navigate to Server Settings, and copy the Local directory path at the bottom.


8. Open a new folder, and paste this address in the location bar. Keep this window open, as you'll need it for the following steps:


9. Go to Start > All Programs > Accessories > Notepad and start the program. Use it to open the toIMAP.cfg file in the toIMAP folder you downloaded to your Desktop. Make sure your configuration file is set up like the one below, subbing in your username and password:
{
     'host' : 'imap.googlemail.com',
     'user':'YOU@gmail.com',
     'password':'YOURPASSWORD',
     'ssl': True
}
10. Save the file and close it. Your configuration file is now set; all that is left is to run the file.

Go to your Windows Start menu and type cmd.exe in the search box, pressing ENTER. The Windows command-line prompt will open.

You'll need to be at the same level as the file; for Microsoft Vista, the path would be (where "YOU" is your username): C:\Users\YOU\Desktop\toIMAP. To do this, you'll need to change directories (cd) into the folder on your desktop:
cd C:\Users\YOU\Desktop\toIMAP
To run the uploader script, you'll use the following convention while still sitting at the level in step 9:
toIMAP.exe -m path_i_just_copied/FOLDER_NAME -f FOLDER_NAME
For example, if I want to upload the folder "admin stuff" (shown in step 8), I would type (surrounding my file path with quotation marks to bypass the space between "admin" and "stuff"):
toIMAP.exe -m "C:\Users\YOU\AppData\Roaming\Thunderbird\Profiles\76sexgps.default\ImapMail\imap.googlemail.com\admin stuff" -f "admin stuff"
Some Gmail flags like Starred may need to omit the -f "admin stuff" part.

To specify a different Gmail tag than the name of the Thunderbird folder, just pass -f the new name, making sure that the tag already exists in your new account per step 6.

For example, to move your chats, you will not be able to use the same "Chats" name for your tag as that is reserved by Google. You'll need to create a new tag in your new account—I used "Archived Chats"—then import using the additional -f flag:
toIMAP.exe -m "C:\Users\YOU\AppData\Roaming\Thunderbird\Profiles\76sexgps.default\ImapMail\imap.googlemail.com\[Gmail].sbd\Chats" -f "Archived Chats"
If your upload gets interrupted at any point, see the toIMAP directions on how to resume where you left off.

11. Repeat step 10 for as many folders as you need to migrate. Once you have gone through every folder you want backed up, you're done. Bliss is yours.

How to migrate mail from one Gmail account to another on Mac OSX, including Chats


This is the Mac OSX version of this article. The Windows version can be found here.

Recently at work, we got a new Gmail domain and had to switch from one Gmail account to another.

You can migrate your mail easily using POP3, but POP3 won't get your chats or preserve your labels. The superior solution is IMAP, even if it's a little more cumbersome. And even if you have already migrated using POP3, IMAP will still allow you to retrieve your chats and work for you on a tag-by-tag basis.

IMAP requires bit of a work-around—you must first fully download all your files to your machine, and only then can you migrate them back again into your new Gmail account.

Here's everything you need to get set up.

First, the downloads.
  1. Download the Mac edition of Mozilla Thunderbird and install on your machine.
  2. Download and untar the toIMAP files (we'll set these up later)
Now log in to your usual (old) Gmail account.

Then:

1. Click the gear icon in the upper-right corner and select Mail settings:


2. Click the Forwarding and POP/IMAP tab, scroll down to IMAP Access, and make sure it is turned on:


3. Click Labels and make sure that Chats and any other labels you want migrated are checked. (Note: If you already used the POP3 solution, you might want to limit only to Chats.)


4. Open Thunderbird, click Create a new account and use the address you want to pull the mail from, then click Continue:


Note: The wizard should smartly detect the proper settings; if not, you can click Manual config and enter the IMAP and SMTP settings shown below:


5. Click Create Account and let Thunderbird start downloading; this may take hours, and it goes without saying that the more mail you have, the longer the process will be. If you have to shut down for a while, to easily restart where you left off, just open Thunderbird, right-click, and click Get Messages in the context menu:


6. Log in to your new account and repeat steps 1 and 2 above for it. Make sure that you re-create any custom labels you used in your old account:


Now... go find something else to do for a few hours and come back to step 7 after Thunderbird (eventually) finishes.

7. Yay! Your e-mail finally downloaded! Rejoicing, right-click your account name, and click Settings (last option shown in the screen shot for step 5). Navigate to Server Settings, and copy the Local directory path at the bottom.


8. Open Finder, and select Go > Go To Folder, then paste the path you just copied. Keep this window open, as you'll need it for the following steps:


9. Open a new terminal window and type the following lines on your Mac:
cd ~/Desktop/toIMAP
vim toIMAP.cfg
i
The "i" puts you in insert mode; make sure your configuration file is set up like the one below, subbing in your username and password:
{
     'host' : 'imap.googlemail.com',
     'user':'YOU@gmail.com',
     'password':'YOURPASSWORD',
     'ssl': True
}
Then press ESC to exit insert mode, and type:
:wq!
to write and quit (save and exit) your configuration file.

10. Your configuration file is set; now all that is left is to run the file. Unfortunately, it does not appear that the script is smart enough to parse all folders at once, so you'll need to parse a single folder at a time, hence the opened Finder window in step 8 so you can reference each of your mail folders.

To run the file, you'll use the following convention while still sitting at the level in step 9:
python toIMAP.py -m path_i_just_copied/FOLDER_NAME -f FOLDER_NAME
For example, if I want to upload the folder "admin stuff" (shown in step 8), I would type (using a backslash to escape the space between "admin" and "stuff"):
python toIMAP.py -m ~/Library/Thunderbird/Profiles/76sexgps.default/ImapMail/imap.googlemail.com/admin\ stuff -f "admin stuff"
Some Gmail flags like Starred may need to omit the -f "admin stuff" part.

To specify a different Gmail tag than the name of the Thunderbird folder, just pass -f the new name, making sure that the tag already exists in your new account per step 5.

For example, to move your chats, you will not be able to use the same "Chats" name for your tag as that is reserved by Google. You'll need to create a new tag in your new account—I used "Archived Chats"—then import using the additional -f flag:
python toIMAP.py -m ~/Library/Thunderbird/Profiles/76sexgps.default/ImapMail/imap.googlemail.com/[Gmail].sbd/Chats -f "Archived Chats"
If your upload gets interrupted at any point, see the toIMAP directions on how to resume where you left off.

11. Repeat step 10 for as many folders as you need to migrate. Once you have gone through every folder you want backed up, you're done. Bliss is yours.

Saturday, October 08, 2011

Javascript: A Better typeof -- Accurately Determine the Type of Variable (Array, String, Boolean, Number, Function, etc.)

If you have ever needed to determine the type of a given Javascript variable, you have probably found the native typeof somewhat inadequate.

Here's a complete solution, adapted from one originally seen on JavaScript Garden:
var realTypeOf = function(obj) {
    return Object.prototype.toString.call(obj).slice(8, -1);
};

// usage
realTypeOf('hi there'); // String
realTypeOf(true); // Boolean
realTypeOf({}); // Object
realTypeOf([]); // Array
realTypeOf(function() {}); // Function
realTypeOf(new Date()); // Date
realTypeOf(/[0-9]/); // RegExp
realTypeOf($('does-not-exist')); // Null
realTypeOf(document.body); // HTMLBodyElement
realTypeOf($('output-box')); // HTMLDivElement
realTypeOf($$('a')[0]); // HTMLAnchorElement
realTypeOf($$('link')[0]); // HTMLLinkElement
realTypeOf($$('script')[0]); // HTMLScriptElement
realTypeOf(999); // Number
realTypeOf(Math.min(3, 7)); // Number
Try it out in real-time with this JSFiddle example set.