Friday, August 17, 2012
Featuring "Vim and Vi Tips: Essential Vim and Vi Editor Skills, 2nd ed."
A co-worker friend sent all the devs in the office a link to the Kindle edition of Vim and Vi Tips: Essential Vim and Vi Editor Skills, 2nd ed. today after a friend of his had sent it to him.
The book is a solid resource on vim, and it's currently free on Amazon. To get your copy, just click the cover below and go.
If you don't have a Kindle, don't worry: you should be able to read it with Amazon's built-in delivery system; if not, they also offer a free Kindle App for just about any device you could own, ranging from smartphones to tablets to computers.
Related posts: Colorizing Vim: How To Change Color Schemes in Vim
Saturday, July 14, 2012
Regular Expressions in JavaScript
Note: This regular expressions reference guide was first compiled from resources on the net for a presentation at work slightly over two years ago (May 5, 2010). I am just now posting it here, partly because I finally got around to adding proper regular expression highlighting to the JavaScript highlighter used on this blog. :)
Table of Contents
Pattern Flags
Three pattern flags may be specified with regular expressions: g, i, and m.- g = global, performs a global search
- i = ignore case, is case insensitive
- m = multiline, treats line endings/beginnings like string terminators when used with ^ and/or $
Using Literal Notation
JavaScript regular expressions are commonly created using literal notation (via opening and closing forward slashes / /). Pattern flags can be specified after the second slash.// match all 7-digit numbers globally
var phonenumber = /\d{7}/g;Note: Normally you will want to use the literal notation if you know the pattern you need to use in advance, as it results in cleaner syntax and boasts a slight performance gain. (Literals are compiled as source code; extended objects are not.)
Native RegExp Constructor:
Native JavaScript contains its own RegExp constructor, useful for building dynamic regular expressions when you do not know ahead of time the pattern value.There are three main things to remember when using the RegExp object:
- The string portion of the pattern goes inside quotation marks.
- The escapes of special characters need to be escaped with a back slash (\).
- An optional second parameter allows pattern flags to be passed.
// a simple digit-only RegEx with a global flag
var myRegExp = new RegExp('\\d', 'g');
// with variable (can be +'d with string for complex expressions)
var myRegExp = new RegExp(someVar, 'g');Regular Expression Methods
test()
Format: RegExp.test(string);Simplest, least costly method. Returns boolean true or false.
console.log(/vanna/i.test('Vanna'));
// returns true because "i" is specified
console.log(/vanna/.test('Vanna'));
// returns falseexec()
Format: RegExp.exec(string);Similar to match(), except that the parameter is the string, not the regular expression. Returns array of matches, or null if no match is found. Note that the 0-item index will always be the full pattern match.
var match = /s(amp)le/i.exec('Sample text');
// returns ['Sample', 'amp']As with exec(), the regular expression is the first refinement, the string the parameter.match()
Format: string.match(RegExp);Functionally identical to exec() in all ways, except refinement and parameter is reversed. Also returns null or an array with 0-item being the full string.
search()
Format: string.search(RegExp);Returns -1 if not found or index of match.
Note: Does NOT support global searches; the g pattern flag is not supported.
'Amy and George were married'.search(/george/i); // returns 8
split()
Format: string.split(RegExp);Converts strings into array, splitting the string on literal or regex delimiter and puts the chunks in the array. Does NOT return the delimiter(s).
// returns the array ["1", "2", "3", "4", "5"] because // the regular expression factors in discrepancy in spacing var oldString = '1,2, 3, 4, 5'; var newString = oldString.split(/\s*,\s*/);
replace()
Format: string.replace(searchFor, replaceWith);This particular method has a lot of flexibility. We can use string literals for the search and replace values:
'My car is hot'.replace('car', 'girl');
// returns "My girl is hot"We can use regular expressions and call back the captured values up to 9 places ($1 – $9):// Matching on word boundaries with a space between, // capturing the boundaries. var reorderName = 'Mary Jane'.replace(/(\b) (\b)/, "$2, $1"); // Returns "Jane, Mary"But what if you need to replace multiple characters, not just re-order or replace single values? replace() also supports anonymous functions:
// The string portion of the pattern goes inside
// quotation marks. Special characters need to be escaped
// with a back slash (An optional second paramater allows
// pattern flags to be passed.)
var testStr = 'He wrote, "2 < 3 is a true statement" on the board.';
// match any of these characters
var myRx = /[><"'&]/g;
var escapedString = testStr.replace(myRx, function(match) {
switch (match) {
case '<':
return '<';
case '>':
return '>';
case '"':
return '"';
case "'":
return ''';
case '&':
return '&';
}
});Or, we can simply pass in an existing method, provided it accepts a single parameter. Note that we do not add the invocation () to the function name or pass it any variables: The replace() method will automatically call the passed function.// Function: replaceChars
var replaceChars = function(match) {
switch (match) {
case '<':
return '<';
case '>':
return '>';
case '"':
return '"';
case "'":
return ''';
case '&':
return '&';
}
};
// no invocation or passed values
var escapedStr2 = testStr.replace(myRx, replaceChars);
// The results are identical
console.log(escapedStr);
// He wrote, "2 < 3 is a true statement" on the board.
console.log(escapedStr2);
// He wrote, "2 < 3 is a true statement" on the board.Pattern Flags (Switches) | ||
|---|---|---|
| Property | Description | Example |
| i | Ignore the case of characters. | /The/i matches "the" and "The" and "tHe" |
| g | Global search for all occurrences of a pattern | /ain/g matches both "ain"s in "No pain no gain", instead of just the first. |
| gi | Global search, ignore case. | /it/gi matches all "it"s in "It is our IT department" |
| m | Multiline mode. Causes ^ to match beginning of line or beginning of string. Causes $ to match end of line or end of string. JavaScript1.5+ only. | /hip$/m matches "hip" as well as "hip\nhop" |
Position Matching | ||
|---|---|---|
| Symbol | Description | Example |
| ^ | Only matches the beginning of a string. | /^The/ matches "The" in "The night" but not "In The Night" |
| $ | Only matches the end of a string. | /and$/ matches "and" in "Land" but not "landing" |
| \b | Matches any word boundary (test characters must exist at the beginning or end of a word within the string) | /ly\b/ matches "ly" in "This is really cool." |
| \B | Matches any non-word boundary. | /\Bor/ matches “or” in "normal" but not "origami." |
| (?=pattern) | A positive look ahead. Requires that pattern is within the input. Pattern is not included as part of the actual match. | /(?=Chapter)\d+/ matches any digits when it's preceded by the words "Chapter", such as 2 in "Chapter 2", though not "I have 2 kids." |
| (?!pattern) | A negative look ahead. Requires that pattern is not within the input. Pattern is not included as part of the actual match. | /JavaScript(?! Kit)/ matches any occurrence of the word "JavaScript" except when it's inside the phrase "JavaScript Kit" |
Literals | ||
|---|---|---|
| Symbol | Description | |
| Alphanumeric | All alphabetical and numerical characters match themselves literally. So /2 days/ will match "2 days" inside a string. | |
| \O | Matches NUL character. | |
| \n | Matches a new line character | |
| \f | Matches a form feed character | |
| \r | Matches carriage return character | |
| \t | Matches a tab character | |
| \v | Matches a vertical tab character | |
| [\b] | Matches a backspace. | |
| \xxx | Matches the ASCII character expressed by the octal number xxx. \50 matches left parentheses character "(" | |
| \xdd | Matches the ASCII character expressed by the hex number dd \x28 matches left parentheses character "(" | |
| \uxxxx | Matches the ASCII character expressed by the UNICODE xxxx. \u00A3 matches "£" | |
Character Classes | ||
|---|---|---|
| Symbol | Description | Example |
| [xyz] | Match any one character enclosed in the character set. You may use a hyphen to denote range. For example. /[a-z]/ matches any letter in the alphabet, /[0-9]/ any single digit. | /[AN]BC/ matches "ABC" and "NBC" but not "BBC" since the leading “B” is not in the set. |
| [^xyz] | Match any one character not enclosed in the character set. The caret indicates that none of the characters should match. NOTE: the caret used within a character class is not to be confused with the caret that denotes the beginning of a string. Negation is only performed within the square brackets. | /[^AN]BC/ matches "BBC" but not "ABC" or "NBC". |
| . | (Dot). Match any character except newline or another Unicode line terminator. | /b.t/ matches "bat", "bit", "bet" and so on. |
| \w | Match any alphanumeric character including the underscore. Equivalent to [a-zA-Z0-9_]. | /\w/g matches "200" in "200%" |
| \W | Match any single non-word character. Equivalent to [^a-zA-Z0-9_]. | /\W/ matches "%" in "200%" |
| \d | Match any single digit. Equivalent to [0-9]. | |
| \D | Match any non-digit. Equivalent to [^0-9]. | /\D/g matches "No " in "No 342222" |
| \s | Match any single space character. Equivalent to [ \t\r\n\v\f]. | |
| \S | Match any single non-space character. Equivalent to [^ \t\r\n\v\f]. | |
Repetition | ||
|---|---|---|
| Symbol | Description | Example |
| {x} | Match exactly x occurrences of a regular expression. | /\d{5}/ matches 5 digits. |
| {x,} | Match x or more occurrences of a regular expression. | /\s{2,}/ matches at least 2 whitespace characters. |
| {x,y} | Matches x to y number of occurrences of a regular expression. | /\d{2,4}/ matches at least 2 but no more than 4 digits. |
| ? | Match zero or one occurrences. Equivalent to {0,1}. | /a\s?b/ matches "ab" or "a b". |
| * | Match zero or more occurrences. Equivalent to {0,}. | /we*/ matches "w" in "why" and "wee" in "between", but nothing in "bad" |
| + | Match one or more occurrences. Equivalent to {1,}. | /fe+d/ matches both "fed" and "feed" |
Alternation & Grouping | ||
|---|---|---|
| Symbol | Description | Example |
| ( ) | Grouping characters together to create a clause. May be nested. | /(abc)+(def)/ matches one or more occurrences of "abc" followed by one occurrence of "def". |
| ( ) | Apart from grouping characters (see above), parenthesis also serve to capture the desired subpattern within a pattern. The values of the subpatterns can then be retrieved using RegExp.$1, RegExp.$2 etc after the pattern itself is matched or compared. For example, the following matches "2 chapters" in "We read 2 chapters in 3 days", and furthermore isolates the value "2": var myString = "We read 2 \ chapters in 3 days"; var needle = /(\d+) chapters/; // matches "2 chapters" myString.match(needle); // alerts captured subpattern, // or "2" alert(RegExp.$1); The subpattern can also be back referenced later within the main pattern. See "Back References" below. | The following finds the text "John Doe" and swaps their positions, so it becomes "Doe John": "John Doe" .replace(/(John) (Doe)/, "$2 $1"); |
| (?:x) | Matches x but does not capture it. In other words, no numbered references are created for the items within the parenthesis. | /(?:.d){2}/ matches but doesn't capture "cdad". |
| x(?=y) | Positive lookahead: Matches x only if it's followed by y. Note that y is not included as part of the match, acting only as a required conditon. | /George(?= Bush)/ matches "George" in "George Bush" but not "George Michael" or "George Orwell". /Java(?=Script|Hut)/ matches "Java" in "JavaScript" or "JavaHut" but not "JavaLand". |
| x(?!y) | Negative lookahead: Matches x only if it's NOT followed by y. Note that y is not included as part of the match, acting only as a required conditon. | /^\d+(?! years)/ matches "5" in "5 days" or "5 oranges", but not "5 years". |
| | | Alternation combines clauses into one regular expression and then matches any of the individual clauses. Similar to OR statement. | /(ab)|(cd)|(ef)/ matches "ab" or "cd" or "ef". |
Back References | ||
|---|---|---|
| Symbol | Description | |
| ( )\n | \n (where n is a number from 1 to 9) when added to the end of a regular expression pattern allows you to back reference a subpattern within the pattern, so the value of the subpattern is remembered and used as part of the matching. A subpattern is created by surrounding it with parenthesis within the pattern. Think of \n as a dynamic variable that is replaced with the value of the subpattern it references. For example: /(hubba)\1/ is equivalent to the pattern /hubbahubba/, as \1 is replaced with the value of the first subpattern within the pattern, or (hubba), to form the final pattern. Lets say you want to match any word that occurs twice in a row, such as "hubba hubba." The expression to use would be: /(\w+)\s+\1/ \1 is replaced with the value of the first subpattern's match to essentially mean "match any word, followed by a space, followed by the same word again." If there were more than one set of parentheses in the pattern string you would use \2 or \3 to match the desired subpattern based on the order of the left parenthesis for that subpattern. In the example: /(a (b (c)))/ \1 references (a (b (c))), \2 references (b (c)), and \3 references (c). | |
Regular expressions to match JavaScript comments:
// match single-line comments (like this one) globally
/\/\/.*/g
// match multi-line comments (/* ... */) globally
/\/\*([^\*]|\*(?!\/))*\*\//g
// or combine both patterns in one using "|" (pipe)
/\/\*([^\*]|\*(?!\/))*\*\/|\/\/.*/g
// wrap in parens to capture and callback: "(pattern)|(pattern2)"
// as perhaps used in an auto syntax highlighter...
myJSString.replace(/(\/\*([^\*]|\*(?!\/))*\*\/)|(\/\/.*)/g, function(match) {
return '<span class="comment">' + match + '</span>';
}); Validate e-mail addresses:
/\b[A-Z0-9._%+-]+@[A-Z0-9.-]+\.[A-Z]{2,4}\b/Sources:- JavaScript Kit, "JavaScript Reference > RegExp (regular expression) object: Regular Expressions in JavaScript." Retrieved 05/25/2010. http://www.javascriptkit.com/jsref/regexp.shtml.
- JavaScript Kit, "Programmer's Guide to Regular Expressions." Retrieved 05/25/2010. http://www.javascriptkit.com/javatutors/redev.shtml.
- Regular-Expressions.Info, "How to Find or Validate an Email Address." Retrieved 05/25/2010. http://www.regular-expressions.info/email.html.
- Regular-Expressions.Info, "JavaScript RegExp Object - Using Regular Expressions with Client-Side Scripting." Retrieved 05/25/2010. http://www.regular-expressions.info/javascript.html.
Monday, May 07, 2012
Perl Diver 2.33: Download and Installation
If you write—or need to maintain—Perl scripts, it can be incredibly helpful to have a way to print out all your environmental variables, installed modules, and the like, much like PHP's phpinfo().
Up until 2006, a site called ScriptSolutions.com—no longer in service—offered a free program you could install called Perl Diver. Version 2 of the script offered a lot of extra functionality. The last version of the script to be released was 2.33, which fixed an exploitable hole in the module parameter for versions 2.x prior to this release.
The bottom line is that Perl Diver is still an excellent tool, and it's a shame to see the fixed version leave the public realm with no place to download.
Download, Basic Installation:
After searching everywhere for a copy, I finally secured one, and am again offering the script to the public.If you have git access, obtaining a copy from GitHub is as simple as:
# as ssh git clone git://github.com/mrrena/perldiver # as https git clone https://github.com/mrrena/perldiverOtherwise, download a copy of the perldiver zip. Installation should be a matter of unzipping the contents of this file wherever you keep your Perl scripts.
If you do not have git access (file permissions are automatically retained in git), you will also need to give the script execution permission, either using the following command:
chmod +x perldiver.plOr via an FTP program like FileZilla, setting perldiver.pl to "755": refer to this blog post if you don't know how to do that.
If you need to change the extension to .cgi, you will also need to change the file name in perldiver.conf:
# only if you change the file extension to "cgi" 'script_name' => 'perldiver.cgi',
Hide From Search Engines:
To keep the search engines from indexing the page in their results—you probably don't want to broadcast your server's environmental variables to the entire world—you should also create an entry in your robots.txt file.If you don't have one already, create a plain text file and enter the following lines (assuming that the directory in which you're including Perl Diver is cgi-bin):
User-agent: * Disallow: cgi-bin/perldiverSave your file with the name robots.txt, and then upload this file to your web server's root directory.
All paths specified in the file are relative to root; you can check your file at this link or, if you have a free account, you can use Google's Webmaster Tools for the same. For more info on robots.txt files, see Google's Block or remove pages using a robots.txt file.
Password Protecting:
It's also a really good idea that you keep the script from hackers manually fishing for info. Perl Diver is used on a lot of websites, and hackers have learned to look for unprotected copies. You can avoid this type of hack by password protecting the perldiver directory. Assuming that you use Apache, directions follow.You will need to replace Apache's example username rbowen below with the username used when you access scripts from your site via http / https. Here is the relevant excerpt from Apache's Authentication, Authorization and Access Control page:
Getting it working
Here's the basics of password protecting a directory on your server.
You'll need to create a password file. This file should be placed somewhere not accessible from the web. This is so that folks cannot download the password file. For example, if your documents are served out of /usr/local/apache/htdocs you might want to put the password file(s) in /usr/local/apache/passwd.
To create the file, use the htpasswd utility that came with Apache. This will be located in the bin directory of wherever you installed Apache. To create the file, type:
htpasswd -c /usr/local/apache/passwd/passwords rbowenhtpasswd will ask you for the password, and then ask you to type it again to confirm it:
$ htpasswd -c /usr/local/apache/passwd/passwords rbowen New password: mypassword Re-type new password: mypassword Adding password for user rbowenIf htpasswd is not in your path, of course you'll have to type the full path to the file to get it to run. On my server, it's located at /usr/local/apache/bin/htpasswd
Next, you'll need to configure the server to request a password and tell the server which users are allowed access. You can do this either by editing the httpd.conf file or using an .htaccess file. For example, if you wish to protect the directory /usr/local/apache/htdocs/secret, you can use the following directives, either placed in the file /usr/local/apache/htdocs/secret/.htaccess, or placed in httpd.conf inside a <Directory /usr/local/apache/apache/htdocs/secret> section.
AuthType Basic AuthName "Restricted Files" AuthUserFile /usr/local/apache/passwd/passwords Require user rbowenFor additional details, see the full Apache manual page.
Saturday, May 05, 2012
pss: The Command-line Search Tool I Never Leave Home Without
Use:
Ever since I discovered the Python tool pss, I fell in love. It's blazingly fast and drop-dead simple to use. 99% of the time, you just type:pss "search phrase"The idea is pss REGEXP: you can use an escape character if you need to search for a character literal:
pss "\$method = 'post'"or triple escape if searching for a single pattern (that is, an unquoted string):
pss \\\$methodI tend to think of pss as a sort of "grep+" for this kind of searching:* it's automatically recursive, whereas grep is not, and it ignores certain file types by default. (These can all be configured: for additional information, see Announcing pss, pss0.3.5, and Usage samples.)
Installation:
Assuming that you have Python installed on your machine (if not, grab it here), you can install pss using pip:pip install pssIf you do not have pip, you should be able to just type:
easy_install pip pip install pssFinally, if you don't have easy_install either, you can get the toolkit / directions at setuptools 0.6c11.
* grep is still invaluable for piped searches:
tail package.json | grep "MIT +no-false-attribs" yum list available | grep mysql
And don't forget find...
1. When you want to search for file / directory names:# find the php.ini config file starting at the /etc directory find /etc -name 'php.ini' # find all .php files starting at local directory (.) find . -name '*.php'2. When you want to bulk-replace file extensions:
# change .JPG to .jpg for all files starting at local directory
find . -name '*.JPG' -exec rename -s .JPG .jpg {} \;3. When you want to bulk delete files:# delete all .pyc files starting at local directory
# GNU find
find . -name '*.pyc' -delete
# Universal
find . -name '*.pyc' | xargs rm -f {} \;
Labels:
command-line,
delete,
easy_install,
find,
grep,
grep replacement,
pip,
pss,
python,
rename,
simple search,
tail
Sunday, April 29, 2012
Colorizing Vim: How To Change Color Schemes in Vim
Colorizing Vim
Note: It is recommended (but not required) that you download VimConf, the vim customization we use at IWS: simply follow the directions under Setup on the GitHub page.
Also, if you're on Mac OSX, you will want to use iTerm2 if you don't already, as it supports 256 colors and provides improved functionality over the native Terminal app.
Changing your vim colors is pretty easy, particularly if all you are doing is installing pre-packaged color schemes.
First, navigate to the .vim subdirectory:
# with VimConf cd ~/VimConf/.vim # without VimConf cd ~/.vim
Then check and see if you have a colors directory:
ls
If not, make one...
mkdir colors
then switch into it...
cd colors
Google Code's Vim Color Scheme Test has screen shots and links for 428 different vim schemes. Under the heading Browse By File Type at the bottom of the page, select the language you'd like to see the vim screen shots in. This will take you to the page of screen shots, which take a while to load, as there are 428 schemes in 428 iframes. (Smiles.)
Above each screen shot is the name of the scheme, which doubles as a direct link to the scheme's source file. Just right click the scheme's name, then select Copy Link Address (in Chrome) or Copy Link Location (in Firefox) from the context menu.
Once copied, you can use wget + paste to park the file directly in your colors directory without further modification. For example, I selected the following schemes, all of which are compatible with 256 colors:*
wget http://vimcolorschemetest.googlecode.com/svn/colors/jellybeans.vim wget http://vimcolorschemetest.googlecode.com/svn/colors/xoria256.vim wget http://vimcolorschemetest.googlecode.com/svn/colors/lucius.vim wget http://vimcolorschemetest.googlecode.com/svn/colors/wombat256.vim wget http://vimcolorschemetest.googlecode.com/svn/colors/asmanian_blood.vim wget http://vimcolorschemetest.googlecode.com/svn/colors/desert256.vim wget http://vimcolorschemetest.googlecode.com/svn/colors/zenburn.vim wget http://vimcolorschemetest.googlecode.com/svn/colors/inkpot.vim
Finally, to actually use a color scheme you downloaded, open your vimrc file...
# with VimConf vim ~/VimConf/.vimrc_custom # without vim ~/.vimrc
...and add colorscheme, a space, and the name of the file (minus the extension). Using jellybeans.vim as the example, it would look like so:
colorscheme jellybeans
Then save your file, and...
Enjoy!
Eric
Related posts: Featuring "Vim and Vi Tips: Essential Vim and Vi Editor Skills, 2nd ed."
* I mention 256 colors for a reason: not all of the featured schemes render correctly (at least without disabling your 256 color support). Many offer a "256" version, however, as seen in the sample links above.
A second thing to note is that if you load a scheme and get weird load errors, that usually is because the file was saved on a Windows machine and the line endings are bonked (Unix/Linux uses \n, Mac \r, and Windows \r\n).
There are probably better solutions, but my approach was to...
copy the readout in my terminal, empty the file with...
then open the now empty file in vim...
make sure that I'm in paste mode...
go into insert mode
and manually paste the contents back in.
A second thing to note is that if you load a scheme and get weird load errors, that usually is because the file was saved on a Windows machine and the line endings are bonked (Unix/Linux uses \n, Mac \r, and Windows \r\n).
There are probably better solutions, but my approach was to...
cat affected_file.vim
copy the readout in my terminal, empty the file with...
> affected_file.vim
then open the now empty file in vim...
vim affected_file.vim
make sure that I'm in paste mode...
# with VimConf ,p # without :set nonumber
go into insert mode
i
and manually paste the contents back in.
Friday, February 10, 2012
Firefox 10 Context Menu: Inspect Element versus Inspect Element with Firebug
If you use Firebug and find yourself wanting to inspect an element in Firefox 10 or higher only to be surprised by a dark modal background and breadcrumb trail that looks (and functions) considerably different than the one you're used to seeing when inspecting an element in Firebug...
...there is a work-around for removing the option from the context menu leaving only the usual "Inspect Element with Firebug" at the bottom; see http://jamesroberts.name/blog/2012/02/07/disable-firefox-native-inspect-element-context-menu/ for details.
Sunday, October 30, 2011
How to migrate mail from one Gmail account to another on Windows, including Chats
This is the Microsoft Windows version of this article (though it contains screen shots from Mac). The Mac OSX version can be found here.
Recently at work, we got a new Gmail domain and had to switch from one Gmail account to another.You can migrate your mail easily using POP3, but POP3 won't get your chats or preserve your labels. The superior solution is IMAP, even if it's a little more cumbersome. And even if you have already migrated using POP3, IMAP will still allow you to retrieve your chats and work for you on a tag-by-tag basis.
IMAP requires bit of a work-around—you must first fully download all your files to your machine, and only then can you migrate them back again into your new Gmail account.
Here's everything you need to get set up.
First, the downloads.
- Download Mozilla Thunderbird and install on your machine.
- Download and unzip the toIMAP files (we'll set these up later)
Then:
1. Click the gear icon in the upper-right corner and select Mail settings:
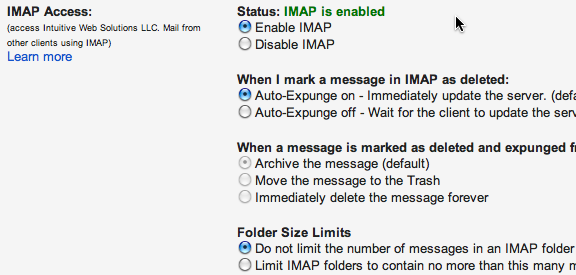
2. Click the Forwarding and POP/IMAP tab, scroll down to IMAP Access, and make sure it is turned on:
3. Click Labels and make sure that Chats and any other labels you want migrated are checked. (Note: If you already used the POP3 solution, you might want to limit only to Chats.)
4. Open Thunderbird, click Create a new account and use the address you want to pull the mail from, then click Continue:
Note: The wizard should smartly detect the proper settings; if not, you can click Manual config and enter the IMAP and SMTP settings shown below:
5. Click Create Account and let Thunderbird start downloading; this may take hours, and it goes without saying that the more mail you have, the longer the process will be. If you have to shut down for a while, to easily restart where you left off, just open Thunderbird, right-click, and click Get Messages in the context menu:
6. Log in to your new account and repeat steps 1 and 2 above for it. Make sure that you re-create any custom labels you used in your old account:
Now... go find something else to do for a few hours and come back to step 7 after Thunderbird (eventually) finishes.
7. Yay! Your e-mail finally downloaded! Rejoicing, right-click your account name, and click Settings (last option in the screen shot for step 5). Navigate to Server Settings, and copy the Local directory path at the bottom.
8. Open a new folder, and paste this address in the location bar. Keep this window open, as you'll need it for the following steps:
9. Go to Start > All Programs > Accessories > Notepad and start the program. Use it to open the toIMAP.cfg file in the toIMAP folder you downloaded to your Desktop. Make sure your configuration file is set up like the one below, subbing in your username and password:
{
'host' : 'imap.googlemail.com',
'user':'YOU@gmail.com',
'password':'YOURPASSWORD',
'ssl': True
}10. Save the file and close it. Your configuration file is now set; all that is left is to run the file.Go to your Windows Start menu and type cmd.exe in the search box, pressing ENTER. The Windows command-line prompt will open.
You'll need to be at the same level as the file; for Microsoft Vista, the path would be (where "YOU" is your username): C:\Users\YOU\Desktop\toIMAP. To do this, you'll need to change directories (cd) into the folder on your desktop:
cd C:\Users\YOU\Desktop\toIMAPTo run the uploader script, you'll use the following convention while still sitting at the level in step 9:
toIMAP.exe -m path_i_just_copied/FOLDER_NAME -f FOLDER_NAMEFor example, if I want to upload the folder "admin stuff" (shown in step 8), I would type (surrounding my file path with quotation marks to bypass the space between "admin" and "stuff"):
toIMAP.exe -m "C:\Users\YOU\AppData\Roaming\Thunderbird\Profiles\76sexgps.default\ImapMail\imap.googlemail.com\admin stuff" -f "admin stuff"Some Gmail flags like Starred may need to omit the -f "admin stuff" part.
To specify a different Gmail tag than the name of the Thunderbird folder, just pass -f the new name, making sure that the tag already exists in your new account per step 6.
For example, to move your chats, you will not be able to use the same "Chats" name for your tag as that is reserved by Google. You'll need to create a new tag in your new account—I used "Archived Chats"—then import using the additional -f flag:
toIMAP.exe -m "C:\Users\YOU\AppData\Roaming\Thunderbird\Profiles\76sexgps.default\ImapMail\imap.googlemail.com\[Gmail].sbd\Chats" -f "Archived Chats"If your upload gets interrupted at any point, see the toIMAP directions on how to resume where you left off.
11. Repeat step 10 for as many folders as you need to migrate. Once you have gone through every folder you want backed up, you're done. Bliss is yours.
How to migrate mail from one Gmail account to another on Mac OSX, including Chats
This is the Mac OSX version of this article. The Windows version can be found here.
Recently at work, we got a new Gmail domain and had to switch from one Gmail account to another.You can migrate your mail easily using POP3, but POP3 won't get your chats or preserve your labels. The superior solution is IMAP, even if it's a little more cumbersome. And even if you have already migrated using POP3, IMAP will still allow you to retrieve your chats and work for you on a tag-by-tag basis.
IMAP requires bit of a work-around—you must first fully download all your files to your machine, and only then can you migrate them back again into your new Gmail account.
Here's everything you need to get set up.
First, the downloads.
- Download the Mac edition of Mozilla Thunderbird and install on your machine.
- Download and untar the toIMAP files (we'll set these up later)
Then:
1. Click the gear icon in the upper-right corner and select Mail settings:
2. Click the Forwarding and POP/IMAP tab, scroll down to IMAP Access, and make sure it is turned on:
3. Click Labels and make sure that Chats and any other labels you want migrated are checked. (Note: If you already used the POP3 solution, you might want to limit only to Chats.)
4. Open Thunderbird, click Create a new account and use the address you want to pull the mail from, then click Continue:
Note: The wizard should smartly detect the proper settings; if not, you can click Manual config and enter the IMAP and SMTP settings shown below:
5. Click Create Account and let Thunderbird start downloading; this may take hours, and it goes without saying that the more mail you have, the longer the process will be. If you have to shut down for a while, to easily restart where you left off, just open Thunderbird, right-click, and click Get Messages in the context menu:
6. Log in to your new account and repeat steps 1 and 2 above for it. Make sure that you re-create any custom labels you used in your old account:
Now... go find something else to do for a few hours and come back to step 7 after Thunderbird (eventually) finishes.
7. Yay! Your e-mail finally downloaded! Rejoicing, right-click your account name, and click Settings (last option shown in the screen shot for step 5). Navigate to Server Settings, and copy the Local directory path at the bottom.
8. Open Finder, and select Go > Go To Folder, then paste the path you just copied. Keep this window open, as you'll need it for the following steps:
9. Open a new terminal window and type the following lines on your Mac:
cd ~/Desktop/toIMAP vim toIMAP.cfg iThe "i" puts you in insert mode; make sure your configuration file is set up like the one below, subbing in your username and password:
{
'host' : 'imap.googlemail.com',
'user':'YOU@gmail.com',
'password':'YOURPASSWORD',
'ssl': True
}Then press ESC to exit insert mode, and type: :wq!to write and quit (save and exit) your configuration file.
10. Your configuration file is set; now all that is left is to run the file. Unfortunately, it does not appear that the script is smart enough to parse all folders at once, so you'll need to parse a single folder at a time, hence the opened Finder window in step 8 so you can reference each of your mail folders.
To run the file, you'll use the following convention while still sitting at the level in step 9:
python toIMAP.py -m path_i_just_copied/FOLDER_NAME -f FOLDER_NAMEFor example, if I want to upload the folder "admin stuff" (shown in step 8), I would type (using a backslash to escape the space between "admin" and "stuff"):
python toIMAP.py -m ~/Library/Thunderbird/Profiles/76sexgps.default/ImapMail/imap.googlemail.com/admin\ stuff -f "admin stuff"Some Gmail flags like Starred may need to omit the -f "admin stuff" part.
To specify a different Gmail tag than the name of the Thunderbird folder, just pass -f the new name, making sure that the tag already exists in your new account per step 5.
For example, to move your chats, you will not be able to use the same "Chats" name for your tag as that is reserved by Google. You'll need to create a new tag in your new account—I used "Archived Chats"—then import using the additional -f flag:
python toIMAP.py -m ~/Library/Thunderbird/Profiles/76sexgps.default/ImapMail/imap.googlemail.com/[Gmail].sbd/Chats -f "Archived Chats"If your upload gets interrupted at any point, see the toIMAP directions on how to resume where you left off.
11. Repeat step 10 for as many folders as you need to migrate. Once you have gone through every folder you want backed up, you're done. Bliss is yours.
Saturday, October 08, 2011
Javascript: A Better typeof -- Accurately Determine the Type of Variable (Array, String, Boolean, Number, Function, etc.)
If you have ever needed to determine the type of a given Javascript variable, you have probably found the native typeof somewhat inadequate.
Here's a complete solution, adapted from one originally seen on JavaScript Garden:
var realTypeOf = function(obj) {
return Object.prototype.toString.call(obj).slice(8, -1);
};
// usage
realTypeOf('hi there'); // String
realTypeOf(true); // Boolean
realTypeOf({}); // Object
realTypeOf([]); // Array
realTypeOf(function() {}); // Function
realTypeOf(new Date()); // Date
realTypeOf(/[0-9]/); // RegExp
realTypeOf($('does-not-exist')); // Null
realTypeOf(document.body); // HTMLBodyElement
realTypeOf($('output-box')); // HTMLDivElement
realTypeOf($$('a')[0]); // HTMLAnchorElement
realTypeOf($$('link')[0]); // HTMLLinkElement
realTypeOf($$('script')[0]); // HTMLScriptElement
realTypeOf(999); // Number
realTypeOf(Math.min(3, 7)); // NumberTry it out in real-time with this JSFiddle example set.
Sunday, October 02, 2011
PHP: Simple and Effective Way to Validate Email Addresses
There are a number of regular expression solutions that have been written to test the validity of user-entered email addresses in PHP, some of them quite good. However, the most consistent and reliable way to validate email addresses takes advantage of PHP's built-in functionality.
filter_var does just what it says: it filters a variable using a variety of pre-defined filters (see the complete list of filters categorized by type); when you are validating email addresses, the filter you want is FILTER_VALIDATE_EMAIL:
if (!filter_var($_POST['email'], FILTER_VALIDATE_EMAIL)) {
exit('E-mail is not valid.');
}
Saturday, August 27, 2011
Object doesn't support property or method 'createContextualFragment': Solved Internet Exporer 9 JavaScript Error
Object doesn't support property or method 'createContextualFragment'
I use a rich-text editor on my site, and received this JavaScript error when trying to view it on IE9. An easy solution exists, however, which I found in a discussion thread; simply add the following lines of code at the top of your file or before the method where you use createContextualFragment which makes it available to the Range object via prototyping.
if ((typeof Range !== 'undefined') && !Range.prototype.createContextualFragment) {
Range.prototype.createContextualFragment = function(html) {
var frag = document.createDocumentFragment();
var div = document.createElement('div');
frag.appendChild(div);
div.outerHTML = html;
return frag;
};
}
Saturday, August 13, 2011
ChromePHP: Google Chrome's PHP Debugging "FirePHP" Extension
Firebug is by far the most popular developer's tool for Firefox. FirePHP is another well-known add-on that allows for debugging PHP. Unquestionably great dev tools.
Google Chrome's built-in debugger is arguably parallel in features and performance to Firefox's Firebug. A lot of devs like using Chrome, but they don't know that they can also debug their PHP in it as well. An extension called ChromePHP bridges that gap.
Still haven't heard of any browser console debuggers for Python in Chrome. Looks like your only choice of a command-line debugger for now is Firefox/Firebug using FirePy (or git clone here), though it probably wouldn't take too much work to use Python's built-in logger to capture and log to the console via JavaScript.
Wednesday, July 06, 2011
JavaScript Basics (HTML, CSS, Selectors, Events)
Note: This entry was first published on the company wiki at IWS to better help Python devs learn Javascript.
It has been here slightly modified to omit or work around IWS-specific customizations, with source code supplied for fromJSON(), toJSON(), and toObject().
You may also want to download MooTools to try some of the examples here, or follow along in your own JSFiddle (where MooTools is the included default).
It has been here slightly modified to omit or work around IWS-specific customizations, with source code supplied for fromJSON(), toJSON(), and toObject().
You may also want to download MooTools to try some of the examples here, or follow along in your own JSFiddle (where MooTools is the included default).
JavaScript Basics: Table of Contents
- HTML is to JavaScript what the Database is to Python
- Brief Glance at HTML: Elements Nested Inside Elements Nested Inside...
- Cascading Style Sheets (CSS): Selecting by Tag Name
- CSS: Syntactic Significance of Commas and Spaces
- CSS Classes and Ids
- Wrapping Up: CSS Tags, Classes, and Ids
- Getting Ready to Cascade: External, Internal, Inline
- ECMAScript a.k.a JavaScript
- The Crooked Path of the DOM
- The Crooked Path Made Straight: JavaScript Frameworks To The Rescue
- My Object-Oriented Tools (a.k.a. MooTools) and CSS Selectors
- MooTools’ $()
- MooTools’ $$()
- MooTools’ each()
- An Input Element’s "name" is to HTML what a Database Field is to MySQL
- toObject()
- fromJSON()
- JSON.decode() equals json.loads(); JSON.encode() equals json.dumps()
- A Magical Event
- Event Bubbling: Leave “on” off in MooTools
- Not All DOM Events Bubble!
- Not All Browsers Bubble Equally!
HTML is to JavaScript what the Database is to Python
Just as a guide on the essentials of using Python for a web-based application would be incomplete without at the very least mentioning how it interacts with the database, so too a guide on JavaScript is incomplete without understanding how it interacts with HTML.To understand JavaScript well, one should have at least a basic understanding of both HTML and CSS, as any web application is made of web pages, and web pages are written in HTML which is itself styled with CSS.
Understanding the power of interactive JavaScript also involves a basic understanding of events: when the user clicks a mouse or enters commands on the keyboard or drags a finger across a screen or track pad, the interface magically responds. The magic between the user action and the result is called an event, and the way JavaScript understands events is by “listening” to an HTML element: by attaching an “event listener.”
We will discuss all these things, and more, in greater detail.
Brief Glance at HTML: Elements Nested Inside Elements Nested Inside...
Let’s begin with a very brief look at HTML, short for “hyper-text markup language.” A typical web page has a doctype declaration that explicitly tells the browser how to render the page. Following this declaration, the entire document is surrounded by opening and closing html tags.Nested inside these outer tags are two other inner sets of tags: an opening and closing head tag followed by an opening and closing body tag. Inside the head tag, things such as the title of page (displayed in the browser history and on the browser tab), any meta data, links to any style sheets, and links to any JavaScript files are specified. The body section that follows contains the actual elements that make up the visible part of the web page.
Here’s a skeleton of a web page using the HTML5 doctype:
<!DOCTYPE html>
<html>
<head>
<title>Sample Page</title>
<meta http-equiv="Content-Type" content="text/html; charset=utf-8" />
<link rel="stylesheet" type="text/css" href="css/some-css-file.css" />
<script type="text/javascript" src="js/some-js-file.js"></script>
</head>
<body>
<p>
I am a single-sentence paragraph on the page.
</p>
<p>
I am another paragraph on the page. I contain two
sentences.
</p>
<p>
I am a third paragraph on the page. I contain three
sentences. See?
</p>
<div>
I am a generic “div” element that contains a
<a href="http://www.some-link.com">hyperlink</a>,
otherwise known as an “anchor” tag, hence the
opening and closing “a” brackets.
</div>
<!-- I am a multi-line HTML comment that the browser
will ignore: I exist only to comment out sections of
HTML markup or to be read by human “marker-uppers”
and “code sniffers.” -->
</body>
</html>Within the opening and closing head tags in the skeleton page above, we define the title, the mime type, then link to an external style sheet, then an external JavaScript file.Notice that we link to the style sheet before linking to the JavaScript: it would technically work in any order, but best practices places a priority on the style sheets first so that the visual elements will not be delayed while the JavaScript is loading.
We could technically include several JavaScript files on a page, and the thing to remember is that order can matter. That is, all JavaScript files have access to the JavaScript in all other JavaScript files loaded in the page (and any inline JavaScript on the page), but if a file gets instantiated immediately and relies on code in another file, the file containing the required code has to be loaded first.
<head>
<script src="js/file-containing-needed-code.js" type="text/javascript"></script>
<script src="js/file-that-needs-above-code.js" type="text/javascript"></script>
</head>It’s a matter of resolving dependencies: add the file you need to make a second file work first, then add the second file.The browser is to JavaScript what the server is to Python: One other point to notice is that the HTML page links to the JavaScript file, which is loaded and interpreted on page load. That explains why, unlike with Python, you have to refresh the HTML page before you will see any changes you have made to the JavaScript file. Whereas the server interprets the Python file, it is the browser that interprets the JavaScript file: different run-time environments!
Returning to the skeleton page, our opening and closing body tags contain three paragraph elements, a div element, an anchor element (nested inside the div), and a comment node.
We now have enough pieces in place to look at CSS, short for “cascading style sheets.” We’ll talk about the “cascading” part in just a moment, but our first order of business is understanding how style sheets work in general.
Cascading Style Sheets (CSS): Selecting by Tag Name
Style sheets consist of key-value pairs, where the key is a predefined CSS property and the value is the setting one wishes to apply for that property. These pairs are assigned on an element-by-element basis.For example, if we wanted to separate all the paragraph tags by 28 pixels and draw a 1px border around them that was bright orange, we could specify that tag (p) followed by curly brackets that contained the key and value pairs we wanted:
/* Only C-style, multi-line comments are permissible in CSS.
#f91 is short for #ff9911, the hex value for a vivid
shade of orange. */
p {
margin-bottom: 28px;
border: solid 1px #f91;
}The above specification could be saved in a text file named “some-css-file” and given a “css” extension; we could then park it inside the “css” directory, and then the <link> tag in our example page would “pull it into the page” and apply a bottom margin of 28 pixels to all paragraphs drawing an orange box around each one.CSS: Syntactic Significance of Commas and Spaces
If we wanted, we could specify additional elements as well, separated by commas:p, div {
margin-bottom: 28px;
border: solid 1px #f91;
}The example above would apply the same style rules to all paragraph and all div elements on the page.By contrast, if we used a space instead of a comma, we wouldn’t see any visual difference in our example page from unformatted HTML. Do you know why?
p div {
margin-bottom: 28px;
border: solid 1px #f91;
}Whereas the comma forms a list of elements, a space says “for all div elements inside of paragraph tags, apply these rules.”This particular example doesn’t make much sense, as div tags would rarely be nested inside paragraph tags anyway (though the reverse might well be true), but in any case, we don’t have any divs inside paragraph tags on the page and thus this rule would simply be ignored.
CSS, then, can use element tag names to target an element. But that’s pretty limited, so there are at least two other very common ways to target an element with CSS. Let’s modify our HTML page slightly to include id and class attributes.
<body>
<p class="paragraph">
I am a single-sentence paragraph on the page.
</p>
<p class="paragraph bold large" id="special-paragraph">
I am another paragraph on the page. I contain two
sentences.
</p>
<p class="paragraph">
I am a third paragraph on the page. I contain three
sentences. See?
</p>
<div id="special-div">
I am a generic “div” element that contains a
<a href="http://www.some-link.com">hyperlink</a>,
otherwise known as an “anchor” tag, hence the opening
and closing “a” tags.
</div>
</body>CSS Classes and Ids
Just like variable names, we can name classes and ids anything we want. The only rule is that ids are mutually exclusive—there can only be one element named a given id on a given page—whereas classes can be used over and over, and, as in our second example, there can be multiple classes separated by spaces for a single element.Accordingly, our example employs three instances of the class “paragraph,” a single instance of the classes “bold” and “large” each, and two unique ids, one named “special-paragraph” and the other “special-div.”
Like variables, we could just as easily have named them “jack-and-jill” or “YellowSunshine” or anything else in the universe we wanted, so long as they (1) started with a letter and (2) were alpha-numeric (including underscores and dashes).
To specify a style rule for a class in CSS, the class name is signified by a dot or period:
.paragraph {
/* some rules */
}To target an id, we need to use the pound sign:#special-div {
/* some rules */
}As with our tag name examples above, multiple elements can be specified with a comma, separated by a space to target selected child elements inside a parent element, or mixed and matched in some combination thereof:#my_div .children, h4, h2.some-class-on-h2-elements, p#a-unique-paragraph-id, .catch-all {
/* rules to apply to this assortment of elements */
}Wrapping Up: CSS Tags, Classes, and Ids
There are other selector methods used to target elements (see Mootools: Complex CSS3 Expressions), but a basic understanding of CSS only requires that we know we can use tags (with no preceding punctuation)...p {
/* some rules */
}Classes (with a dot)....some-class {
/* some rules */
}And ids (with a pound sign)...#unique-id {
/* some rules */
}And that we can target multiple elements at a time with commas or drill down into a parent element using spaces.To summarize what we’ve covered thus far, style sheets specify properties for one or more elements (using tag names, classes, and ids) by means of CSS properties (keys) and user-specified values.
Getting Ready to Cascade: External, Internal, Inline
Additionally, there are three ways that styles can be declared. We’ve covered the first one already:(1) In the <head> section of the page, we can use a <link> element to link to an external style sheet.
(2) In the <head> section of the page, we can use internal <style> tags:
<head>
<style type="text/css">
div {
font-size: 14px;
color: #eedeca;
}
.some-class {
font-weight: bold;
font-family: verdana;
background-color: #e2e3e1;
}
<style>
</head>Side note: You can also write internal JavaScript in the <head> or <body> sections using opening <script type="text/javascript"> and closing </script> tags.
(3) Directly on any element in the <body> section using an inline “style” attribute:
<p style="font-style: italic; margin-left: 30px; font-size: 18px; font-family: georgia; color: blue;">
I am an italicized paragraph with a 30-pixel left margin.
My font size is now 18 pixels, my font family is Georgia,
and I’m feeling blue.
</p>I am an italicized paragraph with a 30-pixel left margin. My font size is now 18 pixels, my font family is Georgia, and I’m feeling blue.
If in my external style sheet, I declare that all paragraph tags should have brown font, but then in the internal <style> tags in my head turn around and say that all paragraph tags should have green font, the browser will render my HTML page with green paragraph text.
But if on one (or more) paragraphs I include an inline style that specifies yellow font, the affected paragraphs will be displayed in yellow font (even though in the internal style rules I specified green and in the external style sheet I stipulated brown). Hence “cascading.”
With a basic understanding of HTML and CSS in place, we’re now ready to talk about JavaScript, formally known as ECMAScript.
ECMAScript a.k.a JavaScript
JavaScript is able to grab and manipulate screen elements; it can also style elements by applying CSS rules directly to them. Both of these are inter-related tasks.The Crooked Path of the DOM
JavaScript interacts with HTML via the Document Object Model, better known as the DOM.The DOM is not HTML and the DOM is not JavaScript: the DOM is a tree-like API that a browser layout engine provides JavaScript for working with HTML.
And, through no fault of JavaScript or modern browser vendors, the DOM has traditionally been a particularly “clunky” and comparatively inefficient way of working with HTML, but it’s the only way we’ve got (and HTML5 is working hard to take some of the sting out of this legacy API).
Now is a good time to mention as well that JavaScript itself depends on browser implementation: a typical browser is written in C and the individual browser vendor (like Microsoft or Mozilla) is responsible for writing the parser/interpreter that compiles JavaScript on page load into C. They do this by coding to an interface—coding to the standard laid out by ECMA International that says method x, y, and z should exist and behave in such-and-such manner—but the actual implementation is left up to the individual vendor.
That means that JavaScript just got more complicated: with Python, once you get the server set up like you like it, you code once and you’re done. But while server-side JavaScript does exist and is gaining in popularity, client-side JavaScript is utterly at the mercy of the browser vendor.
Though times are thankfully changing, engrave this maxim into your forehead: not all browser vendors are created equal!
The Crooked Path Made Straight: JavaScript Frameworks To The Rescue
The “clunkiness” of the DOM and the inconsistencies between browsers is where JavaScript frameworks or libraries—like JQuery, Dojo, Prototype, or IWS’s choice of MooTools (short for “My Object-Oriented Tools”)—really shine.These frameworks are written in pure JavaScript and they smooth out a lot of the inconsistencies between browsers, additionally providing a lot of useful tools that make coding to the browser easier: not quite as smooth as coding to the server perhaps, but definitely a lot closer.
Since we use MooTools at IWS, that will be the framework we’ll look at here.
MooTools makes heavy use of CSS selectors (as the tag, dot, and pound notations we covered above are collectively named) as “handles” to grab hold of elements in the DOM, its selector engine Slick arguably neck-to-neck with JQuery’s well-known Sizzle engine in terms of speed and power. But we don’t care about all that. We just need to know how to use the tools we’ve got to get the job done.
My Object-Oriented Tools (a.k.a. MooTools) and CSS Selectors
In native JavaScript, if we want to grab an element with a unique id, we drill down from the top-level of the DOM, otherwise known as the document:var myElement = document.getElementById('some-element-id-on-the-page');In the example above, we assign the private myElement variable (private because of the var keyword) to the return of document.getElementById. Notice that the method name begins with getElement (singular) not getElements (plural). That is because a CSS id is always supposed to be unique, and we are interested in grabbing just one element.MooTools’ $()
MooTools gives us a shortcut, a shortcut that happens to be shared by virtually all the major frameworks: MooTools gives us the dollar sign:var myElement = $('some-element-id-on-the-page');$() is expecting an id, so we don’t need to pass it the # selector—we just pass a string that corresponds to an actual id that lives on the page. As with the native document.getElementById method, the MooTools’ $() returns null if an element is not found (equivalent to None in Python).null notwithstanding, when testing to see if an element is in the DOM, it is generally best/cleanest simply to test for truthy / falsy:
if (myElement) {
// myElement exists: do something with it
}
if (!myElement) {
// it doesn't exist: create it
myElement = new Element('div');
}The DOM allows native JavaScript to gather together a group of elements in several ways, such as:var myInputsNamedEmail = document.getElementsByName('email');
var myParagraphElms = document.getElementsByTagName('p');These methods all begin with getElements (plural) and, like an array (analogous to a list in Python), they have a length attribute...myParagraphElms.length;which tells us how many paragraphs elements we were able to collect in the second example above.
But their return is not a real array! Instead, the return is actually a DOM object—a collection or formally a NodeList—not a JavaScript array.
Therefore you can’t slice() or push() or pop() or otherwise use JavaScript array methods on it; you have to iterate over it using a for loop and manually pack it into an array before it can be used that way. And once you pack it into an array, it’s no longer a “live” collection of objects such that it dynamically reflects changes made to the DOM (see A collection is not an array for more).
MooTools’ $$()
So what if you want your cake (an array) and you want to eat it to (a “live” collection of nodes)? That’s where MooTools comes to the rescue with the double dollar function: $$(). In short, the double dollar function is meant for collections of elements, and packs them into a live array. (If it helps keep $() and $$() straight, think single dollar equals single element, double dollar equals multiple elements.)So how do we use the $$() method? We pass it unlimited CSS selectors:
// get all elements with class name
// “some-class” on the page
$$('.some-class');
// get all elements with any of these three classes (note
// the commas)
$$('.some-class, .some-other-class, .some-other-class-still');
// inside all divs with “div-class” get all paragraphs with
// “p-class” (note the space)
$$('div.div-class p.p-class');In the last example above, we use a tag and space to drill down; we can also drill down into a single object.Let’s say we have a wrapper element that has the CSS id “myWrapper.” We want to use this myWrapper element as our starting point to drill down and gather all the elements inside of it that have the class name “remove.”
With MooTools, there are two ways we can do this:
// no CSS selector used with $(), but CSS "." selector for its
// getElements() method
var removeElms = $('myWrapper').getElements('.remove');
// CSS selectors for both id "#" and class "." (note the
// space)
var removeElms = $$('#myWrapper .remove');MooTools not only enables us to grab elements using CSS selectors (tag names, class dots, or id pounds along with spaces and commas for the most common ones), it also enables us to set styles on an element.In native JavaScript, if we wanted to set the style font-weight for an element, we would use:
// native Javascript: fontWeight myDivElement.style.fontWeight = 'bold';Notice that while CSS uses hyphens, JavaScript requires that hyphens be translated into camelCase; thus font-weight equals fontWeight and won’t work without this translation.
With MooTools, however, we can set an element style easily without having to do any translations:
// MooTools: standard font-weight
myDivElement.setStyle('font-weight', 'bold');MooTools’ each()
Let’s go back to MooTools’ element arrays, such as the removeElms collection demonstrated a few examples ago. For most tasks, rather than writing a somewhat cumbersome for loop, we can iterate over an array objects using each().MooTools will automatically return to us both the current element being iterated as well as the index of that particular iteration as the first and second parameters (respectively):
removeElms.each(function(myElm, index) {
if (index === 0) {
// if it's the first remove, hide it
myElm.hide();
} else {
// else draw a red border around it
myElm.setStyle('border', 'solid 1px red');
}
});Let’s take a quick look at what’s going on here: Element.each() actually takes just one parameter, and that parameter happens to be a function:function(myElm, index) {
// blah blah
}Because we pass it a function, that is why it has the somewhat strange looking syntax ending in });: the curly bracket is the end of the function and the parenthesis the end of each().There are a number of methods that MooTools provides just for working with the Element object alone, but this guide should give you the very basics of how HTML, CSS, and JavaScript—particularly through the MooTools framework—allows us to interact with elements. For complete documentation on the MooTools Element methods, see the MooTools Docs.
An Input Element’s "name" is to HTML what a Database Field is to MySQL
We now know a bit about the DOM and how JavaScript can interact with it; perhaps the single most important thing we do with the DOM is collect user-entered data. The database would not have any records in it if it were not for this ability, and it is helpful to understand how form elements map to the database.While JavaScript or Python either one can rename keys, in a perfect world, the relationship between the DOM and the database would be one-to-one:
<form id="my-form">
Password: <input type="password" name="pass" /><br />
Name: <input type="text" name="name" /><br />
Age: <input type="text" name="age" /><br />
<input type="submit" />
</form>Above are four input elements in a <form> element that look like so on an unstyled HTML page:toObject()
In the IWS sharedLibrary.js, there are two very useful methods. One is called fromJSON() and the other is called toObject() (toObject is actually a wrapper for toJSON).
All we really need is a wrapper element of any sort surrounding a collection of inner inputs to make it work; we often do not even use the traditional <form> element in BriteCore for this purpose. If we use toObject(), it will provide us with what the Python recognizes as its js_dict parameter:
var submitObj = $('my-form').toObject();The output of the above might be something like this (assuming the values to these object/dictionary keys are the ones the user actually typed in our form):{
'pass': 'a9(_}c8d7bic',
'name': 'Cindy Sutterfield',
'age': '19'
}You can see the one-to-one correspondence between the screen elements and what ultimately becomes the js_dict that gets packed into the database.fromJSON()
Likewise, when the JavaScript makes an Ajax request, Python assembles the dictionary to return, and json.dumps() (stringfies) it back to the front, where MooTools automatically converts this JSON string into a real JavaScript object. Using the same form element ($('my-form')) or other wrapper, we can pre-populate the values using fromJSON():
var submitObj = {
'foo': 'bar'
};
var myRequest = new Request.JSON({
url: '/urls.py?file=foo&method=bar',
onSuccess: function(responseJSON) {
// the JSON response populates the inputs
// inside the form wrapper
$('my-form').fromJSON(responseJSON);
}
}).send(JSON.encode(submitObj));The result?JSON.decode() equals json.loads(); JSON.encode() equals json.dumps()
The last thing to notice is the send() part of the request: we use the MooTools’ method JSON.encode() to stringify the JSON. An equivalent IWS translation to the JSON methods for stringifying/de-stringifying includes:// Javascript JSON.decode(); // turn JSON string into JavaScript object JSON.encode(); // stringify JavaScript object into JSON // Python import json json.loads() // turn JSON string into Python dict json.dumps() // stringify Python dict into JSON
A Magical Event
Last but not least, let’s take a look at JavaScript events, the magical ability JavaScript has of responding to mouse clicks, keyboard presses, or screen touches.An event is quite literally an elaborate object (
dictionary) that the browser fires off when a user interaction takes place; it contains a variety of information including the element that the event took place on as well as its x/y coordinates.
As long as JavaScript has a listener in place on an appropriate element for the appropriate type of event, it can respond to the firing of these events and act accordingly.
At IWS, we typically use an approach to events called “event delegation.” Rather than adding, say, 25 listeners to 25 different elements on the page, we instead use one listener on a wrapper element and “delegate” the event using a series of if/else if statements. We can do that because most events “bubble.”
Event Bubbling: Leave “on” off in MooTools
There are a wide range of DOM events (see here for a complete list), and they all begin with the word “on.” MooTools, however, always leaves off the “on" part, so when you pass the string name of the event to removeEvents and addEvent (demonstrated below), remember to leave it off!But what is event bubbling?
When we looked at HTML earlier, we saw that elements were nested inside elements that were nested inside other elements.
An element that wraps other elements is a “parent” element and any elements that are nested inside of it are its “children.”
When a user clicks on one of these “child” elements, the event first registers on the child, then on that child’s parent, then on that parent’s parent, and so on until it bubbles all the way up to the top of the document.
If we attach an event listener to one of the parents, we can “listen” as its children bubble up, testing to see if a particular child we are interested in has bubbled to the top. If so, we take some course of action: a child with the CSS class “remove,” for example, might be an indication that we need to pop up a user dialog that a record is about to be deleted, requiring the user to confirm that this action was done on purpose.
// MooTools
// MooTools passes us back the event, here as evt
myParent.removeEvents('click').addEvent('click', function(evt) {
var self = this;
// MooTools offers us the element that was clicked via
// “target.” We wrap it in the dollar function for IE
var target = $(evt.target);
// to make sure that anything else we do to the
// element using MooTools’ methods will work on IE
// we now run a series of tests on the element that
// may involve tests for its tag, id, a class it
// contains, or any other property we know is
// true of a given child element we’re interested in
if (target.id == 'save') {
self.save();
} else if (target.hasClass('next')) {
self.goToNextScreen();
} else if (target.hasClass('remove')) {
// perform logic that pops up user confirmation--
// if user OKs, fire off an Ajax call to remove a
// record from the db
}
});Normally we further divide the logic up with an attachEvents method in a class that in turn calls a delegateClick method that contains the if / else if logic inside it, but the idea remains the same: attach one event listener to a parent element and listen for the individual children we’re interested in. Hence, “event delegation.”Additionally, note that we use removeEvents before using addEvent: this keeps an event from doubling up.
If more than one event listener of a given type gets attached to the same element, each one will fire, leading to unpredictable behavior. The user clicks once, but because three instances of a “click” event listener were bound to that element, it is as though the user clicked three times in a row rather than just once.
For more on the Event object in MooTools, see Type: Event in the docs.
To attach an event using only native JavaScript, we could use the following. (I do not know how to remove an event this way, but—so far as I know at least—stacking shouldn’t occur, as we’re making an assignment that gets overwritten each time.)
// native Javascript
myParent.onclick = function(evnt) {
// MooTools takes the following pain out of the equation:
// if IE, the event will be bound on the global “window”
// object rather than passed via “evnt”
var evt = (evnt) ? evnt : window.event;
// if IE, the target will be “srcElement”; if anybody
// else, it will be “target”
var target = (evt.srcElement) ? evt.srcElement : evt.target;
if (target.id == 'save') {
self.save();
}
// blah blah
};Not All DOM Events Bubble!
Not all DOM events bubble. As per the DOM specification, the events onfocus and onblur (when the focus leaves an element) ''should not'' bubble, whereas onchange, onsubmit and onreset ''should'' bubble. You can also listen for onkeyup, onkeydown or onkeypress as these events bubble up the DOM on all browsers.Not All Browsers Bubble Equally!
Now for a really big “gotcha”: remember earlier how we said that not all browser vendors were created equal? Guess what? Just to make life difficult for you, onchange, onsubmit, and onreset do not bubble up in IE even though they are supposed to! This is true of IE8 and below—I’m not sure what the official status is on IE9 and above.To complicate matters further, to my knowledge, there is no work-around in MooTools, so if you are listening for these events and you want to support IE, you need to remember NOT to use event delegation but instead attach an event to each element you want to listen for.
// Ugly $$() hack we use inside RecordSet.Table.LineItemTable.attachEvents() in builder.js
if (Browser.ie) { // change events don't bubble in IE!
$$('.linItm_manualCheckbox, .linItm_deductible, .rISWrap_options, .contentRow_amountInput, .lossExposureGroup, .rIIWrap_input, .singleLineAnswer, .multiLineAnswer, .listAnswer, .ifAddressQuestion_addressLine1, .ifAddressQuestion_addressLine2, input[name=city], select[name=state], input[name=zip], .scheduledItemInput, .contentRow_amountInput, .pb_classification').removeEvents('change').addEvent('change', function(evt) {
if (self.localVars.hasFired !== 1) { // hack to keep IE from firing change event twice in a row
self.localVars.hasFired = 1;
self.delegateChange(evt);
}
});
} else {
$(self.options.tableElements.body).removeEvents('change').addEvent('change', function(evt) {
self.delegateChange(evt);
});
}

Subscribe to:
Posts (Atom)