
Friday, February 10, 2012
Firefox 10 Context Menu: Inspect Element versus Inspect Element with Firebug
If you use Firebug and find yourself wanting to inspect an element in Firefox 10 or higher only to be surprised by a dark modal background and breadcrumb trail that looks (and functions) considerably different than the one you're used to seeing when inspecting an element in Firebug...
 ...there is a work-around for removing the option from the context menu leaving only the usual "Inspect Element with Firebug" at the bottom; see http://jamesroberts.name/blog/2012/02/07/disable-firefox-native-inspect-element-context-menu/ for details.


Sunday, October 30, 2011
How to migrate mail from one Gmail account to another on Windows, including Chats
This is the Microsoft Windows version of this article (though it contains screen shots from Mac). The Mac OSX version can be found here.
Recently at work, we got a new Gmail domain and had to switch from one Gmail account to another.You can migrate your mail easily using POP3, but POP3 won't get your chats or preserve your labels. The superior solution is IMAP, even if it's a little more cumbersome. And even if you have already migrated using POP3, IMAP will still allow you to retrieve your chats and work for you on a tag-by-tag basis.
IMAP requires bit of a work-around—you must first fully download all your files to your machine, and only then can you migrate them back again into your new Gmail account.
Here's everything you need to get set up.
First, the downloads.
- Download Mozilla Thunderbird and install on your machine.
- Download and unzip the toIMAP files (we'll set these up later)
Then:
1. Click the gear icon in the upper-right corner and select Mail settings:

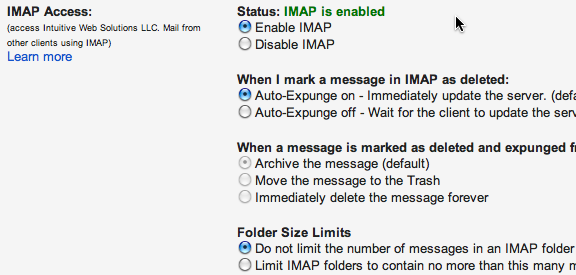
2. Click the Forwarding and POP/IMAP tab, scroll down to IMAP Access, and make sure it is turned on:
3. Click Labels and make sure that Chats and any other labels you want migrated are checked. (Note: If you already used the POP3 solution, you might want to limit only to Chats.)

4. Open Thunderbird, click Create a new account and use the address you want to pull the mail from, then click Continue:

Note: The wizard should smartly detect the proper settings; if not, you can click Manual config and enter the IMAP and SMTP settings shown below:

5. Click Create Account and let Thunderbird start downloading; this may take hours, and it goes without saying that the more mail you have, the longer the process will be. If you have to shut down for a while, to easily restart where you left off, just open Thunderbird, right-click, and click Get Messages in the context menu:

6. Log in to your new account and repeat steps 1 and 2 above for it. Make sure that you re-create any custom labels you used in your old account:

Now... go find something else to do for a few hours and come back to step 7 after Thunderbird (eventually) finishes.
7. Yay! Your e-mail finally downloaded! Rejoicing, right-click your account name, and click Settings (last option in the screen shot for step 5). Navigate to Server Settings, and copy the Local directory path at the bottom.

8. Open a new folder, and paste this address in the location bar. Keep this window open, as you'll need it for the following steps:

9. Go to Start > All Programs > Accessories > Notepad and start the program. Use it to open the toIMAP.cfg file in the toIMAP folder you downloaded to your Desktop. Make sure your configuration file is set up like the one below, subbing in your username and password:
{
     'host' : 'imap.googlemail.com',
     'user':'YOU@gmail.com',
     'password':'YOURPASSWORD',
     'ssl': True
}
10. Save the file and close it. Your configuration file is now set; all that is left is to run the file.Go to your Windows Start menu and type cmd.exe in the search box, pressing ENTER. The Windows command-line prompt will open.
You'll need to be at the same level as the file; for Microsoft Vista, the path would be (where "YOU" is your username): C:\Users\YOU\Desktop\toIMAP. To do this, you'll need to change directories (cd) into the folder on your desktop:
cd C:\Users\YOU\Desktop\toIMAPTo run the uploader script, you'll use the following convention while still sitting at the level in step 9:
toIMAP.exe -m path_i_just_copied/FOLDER_NAME -f FOLDER_NAMEFor example, if I want to upload the folder "admin stuff" (shown in step 8), I would type (surrounding my file path with quotation marks to bypass the space between "admin" and "stuff"):
toIMAP.exe -m "C:\Users\YOU\AppData\Roaming\Thunderbird\Profiles\76sexgps.default\ImapMail\imap.googlemail.com\admin stuff" -f "admin stuff"Some Gmail flags like Starred may need to omit the -f "admin stuff" part.
To specify a different Gmail tag than the name of the Thunderbird folder, just pass -f the new name, making sure that the tag already exists in your new account per step 6.
For example, to move your chats, you will not be able to use the same "Chats" name for your tag as that is reserved by Google. You'll need to create a new tag in your new account—I used "Archived Chats"—then import using the additional -f flag:
toIMAP.exe -m "C:\Users\YOU\AppData\Roaming\Thunderbird\Profiles\76sexgps.default\ImapMail\imap.googlemail.com\[Gmail].sbd\Chats" -f "Archived Chats"If your upload gets interrupted at any point, see the toIMAP directions on how to resume where you left off.
11. Repeat step 10 for as many folders as you need to migrate. Once you have gone through every folder you want backed up, you're done. Bliss is yours.
How to migrate mail from one Gmail account to another on Mac OSX, including Chats
This is the Mac OSX version of this article. The Windows version can be found here.
Recently at work, we got a new Gmail domain and had to switch from one Gmail account to another.You can migrate your mail easily using POP3, but POP3 won't get your chats or preserve your labels. The superior solution is IMAP, even if it's a little more cumbersome. And even if you have already migrated using POP3, IMAP will still allow you to retrieve your chats and work for you on a tag-by-tag basis.
IMAP requires bit of a work-around—you must first fully download all your files to your machine, and only then can you migrate them back again into your new Gmail account.
Here's everything you need to get set up.
First, the downloads.
- Download the Mac edition of Mozilla Thunderbird and install on your machine.
- Download and untar the toIMAP files (we'll set these up later)
Then:
1. Click the gear icon in the upper-right corner and select Mail settings:
2. Click the Forwarding and POP/IMAP tab, scroll down to IMAP Access, and make sure it is turned on:
3. Click Labels and make sure that Chats and any other labels you want migrated are checked. (Note: If you already used the POP3 solution, you might want to limit only to Chats.)
4. Open Thunderbird, click Create a new account and use the address you want to pull the mail from, then click Continue:
Note: The wizard should smartly detect the proper settings; if not, you can click Manual config and enter the IMAP and SMTP settings shown below:
5. Click Create Account and let Thunderbird start downloading; this may take hours, and it goes without saying that the more mail you have, the longer the process will be. If you have to shut down for a while, to easily restart where you left off, just open Thunderbird, right-click, and click Get Messages in the context menu:
6. Log in to your new account and repeat steps 1 and 2 above for it. Make sure that you re-create any custom labels you used in your old account:
Now... go find something else to do for a few hours and come back to step 7 after Thunderbird (eventually) finishes.
7. Yay! Your e-mail finally downloaded! Rejoicing, right-click your account name, and click Settings (last option shown in the screen shot for step 5). Navigate to Server Settings, and copy the Local directory path at the bottom.
8. Open Finder, and select Go > Go To Folder, then paste the path you just copied. Keep this window open, as you'll need it for the following steps:

9. Open a new terminal window and type the following lines on your Mac:
cd ~/Desktop/toIMAP
vim toIMAP.cfg
i
The "i" puts you in insert mode; make sure your configuration file is set up like the one below, subbing in your username and password:
{
     'host' : 'imap.googlemail.com',
     'user':'YOU@gmail.com',
     'password':'YOURPASSWORD',
     'ssl': True
}
Then press ESC to exit insert mode, and type: :wq!to write and quit (save and exit) your configuration file.
10. Your configuration file is set; now all that is left is to run the file. Unfortunately, it does not appear that the script is smart enough to parse all folders at once, so you'll need to parse a single folder at a time, hence the opened Finder window in step 8 so you can reference each of your mail folders.
To run the file, you'll use the following convention while still sitting at the level in step 9:
python toIMAP.py -m path_i_just_copied/FOLDER_NAME -f FOLDER_NAMEFor example, if I want to upload the folder "admin stuff" (shown in step 8), I would type (using a backslash to escape the space between "admin" and "stuff"):
python toIMAP.py -m ~/Library/Thunderbird/Profiles/76sexgps.default/ImapMail/imap.googlemail.com/admin\ stuff -f "admin stuff"Some Gmail flags like Starred may need to omit the -f "admin stuff" part.
To specify a different Gmail tag than the name of the Thunderbird folder, just pass -f the new name, making sure that the tag already exists in your new account per step 5.
For example, to move your chats, you will not be able to use the same "Chats" name for your tag as that is reserved by Google. You'll need to create a new tag in your new account—I used "Archived Chats"—then import using the additional -f flag:
python toIMAP.py -m ~/Library/Thunderbird/Profiles/76sexgps.default/ImapMail/imap.googlemail.com/[Gmail].sbd/Chats -f "Archived Chats"If your upload gets interrupted at any point, see the toIMAP directions on how to resume where you left off.
11. Repeat step 10 for as many folders as you need to migrate. Once you have gone through every folder you want backed up, you're done. Bliss is yours.
Saturday, October 08, 2011
Javascript: A Better typeof -- Accurately Determine the Type of Variable (Array, String, Boolean, Number, Function, etc.)
If you have ever needed to determine the type of a given Javascript variable, you have probably found the native typeof somewhat inadequate.
Here's a complete solution, adapted from one originally seen on JavaScript Garden:
Here's a complete solution, adapted from one originally seen on JavaScript Garden:
var realTypeOf = function(obj) {
    return Object.prototype.toString.call(obj).slice(8, -1);
};

// usage
realTypeOf('hi there'); // String
realTypeOf(true); // Boolean
realTypeOf({}); // Object
realTypeOf([]); // Array
realTypeOf(function() {}); // Function
realTypeOf(new Date()); // Date
realTypeOf(/[0-9]/); // RegExp
realTypeOf($('does-not-exist')); // Null
realTypeOf(document.body); // HTMLBodyElement
realTypeOf($('output-box')); // HTMLDivElement
realTypeOf($$('a')[0]); // HTMLAnchorElement
realTypeOf($$('link')[0]); // HTMLLinkElement
realTypeOf($$('script')[0]); // HTMLScriptElement
realTypeOf(999); // Number
realTypeOf(Math.min(3, 7)); // Number
Try it out in real-time with this JSFiddle example set.
Sunday, October 02, 2011
PHP: Simple and Effective Way to Validate Email Addresses
There are a number of regular expression solutions that have been written to test the validity of user-entered email addresses in PHP, some of them quite good. However, the most consistent and reliable way to validate email addresses takes advantage of PHP's built-in functionality.
filter_var does just what it says: it filters a variable using a variety of pre-defined filters (see the complete list of filters categorized by type); when you are validating email addresses, the filter you want is FILTER_VALIDATE_EMAIL:
if (!filter_var($_POST['email'], FILTER_VALIDATE_EMAIL)) {
     exit('E-mail is not valid.');
}
Saturday, August 27, 2011
Object doesn't support property or method 'createContextualFragment': Solved Internet Exporer 9 JavaScript Error
Object doesn't support property or method 'createContextualFragment'
I use a rich-text editor on my site, and received this JavaScript error when trying to view it on IE9. An easy solution exists, however, which I found in a discussion thread; simply add the following lines of code at the top of your file or before the method where you use createContextualFragment which makes it available to the Range object via prototyping.
if ((typeof Range !== 'undefined') && !Range.prototype.createContextualFragment) {
    Range.prototype.createContextualFragment = function(html) {
        var frag = document.createDocumentFragment();
        var div = document.createElement('div');
        frag.appendChild(div);
        div.outerHTML = html;
        return frag;
    };
}
Saturday, August 13, 2011
ChromePHP: Google Chrome's PHP Debugging "FirePHP" Extension
Firebug is by far the most popular developer's tool for Firefox. FirePHP is another well-known add-on that allows for debugging PHP. Unquestionably great dev tools.
Google Chrome's built-in debugger is arguably parallel in features and performance to Firefox's Firebug. A lot of devs like using Chrome, but they don't know that they can also debug their PHP in it as well. An extension called ChromePHP bridges that gap.
Still haven't heard of any browser console debuggers for Python in Chrome. Looks like your only choice of a command-line debugger for now is Firefox/Firebug using FirePy (or git clone here), though it probably wouldn't take too much work to use Python's built-in logger to capture and log to the console via JavaScript.
Subscribe to:
Posts (Atom)

